Raymii.org

Quis custodiet ipsos custodes?Home | About | All pages | Cluster Status | RSS Feed
SSH on Windows Server 2019 (including how to sudo)
Published: 18-12-2018 | Author: Remy van Elst | Text only version of this article
❗ This post is over six years old. It may no longer be up to date. Opinions may have changed.
Table of Contents
On hackernews I saw a Microsoft blog post stating that Windows Server 2019 now includes OpenSSH. In this post I'll try out both the client and server on a Windows 2019 server, including how to login as a Active Directory Domain user. All documentation from Microsoft on OpenSSH can be found here. The bonus this time is how to elevate permissions via SSH on Windows, sudo but way more complicated. This guide is also applicable on Windows 10, build 1809 and up.
Recently I removed all Google Ads from this site due to their invasive tracking, as well as Google Analytics. Please, if you found this content useful, consider a small donation using any of the options below. It means the world to me if you show your appreciation and you'll help pay the server costs:
GitHub Sponsorship
PCBWay referral link (You get $5, I get $20 after you've placed an order)
Digital Ocea referral link ($200 credit for 60 days. Spend $25 after your credit expires and I'll get $25!)

Installing OpenSSH on Windows
Fire up a powershell prompt as administrator and execute the following command to see if it's installed already:
Get-WindowsCapability -Online | ? Name -like 'OpenSSH*'
Example output:
Name  : OpenSSH.Client~~~~0.0.1.0
State : NotPresent
Name  : OpenSSH.Server~~~~0.0.1.0
State : NotPresent
If they are NotPresent, install them with the below powershell commands:
Add-WindowsCapability -Online -Name OpenSSH.Client~~~~0.0.1.0
Add-WindowsCapability -Online -Name OpenSSH.Server~~~~0.0.1.0
Example output for both:
Path          :
Online        : True
RestartNeeded : False
I had to install all Windows updates before the server part would install (up to december 2018).
Start the openssh server and make sure it starts up automatically. Not required when you only want to use the openssh client.
Start-Service sshd
Set-Service -Name sshd -StartupType 'Automatic'
The setup automatically creates a firewall rule to allow OpenSSH. Check to make sure it is actually created.
Get-NetFirewallRule -Name *ssh*
CMD or Powershell?
The default prompt when SSHing in to a windows server is cmd.exe. Rather bare
and sparse, I recommend you change that to Powershell. It's Windows, so it has
to be changed in the registry, but there is a powershell command to do so:
New-ItemProperty -Path "HKLM:\SOFTWARE\OpenSSH" -Name DefaultShell -Value "C:\Windows\System32\WindowsPowerShell\v1.0\powershell.exe" -PropertyType String -Force
If you have installed bash you can set that to be the default shell by
changing the full -Value path to the bash.exe binary.
Windows OpenSSH client
Using SSH on Windows (open up a powershell window) is as simple as typing in the command and the server to connect to:
ssh user@example.org
You will be prompted for a password, type it, and you're in.
However, using passwords is insecure and will get your server compromised (eventually). SSH has the concept of keys, cryptographicly secure public private keys which can be used for authentication. The rest of this section covers the creation and placement of an SSH keypair on Windows.
You want to install the ssh-agent if you are going to use Windows as ssh
client:
Install-Module -Force OpenSSHUtils -Scope AllUsers
Start-Service ssh-agent
Set-Service -Name ssh-agent -StartupType 'Automatic'
With an ssh-agent, you don't have to type the password for your private key
every time you SSH to a server.
Generating an SSH keypair on Windows
Generate your SSH keypair with the following command:
ssh-keygen
Example output:
Generating public/private rsa key pair.
Enter file in which to save the key (C:\Users\Remy/.ssh/id_rsa):
Created directory 'C:\Users\Remy/.ssh'.
Enter passphrase (empty for no passphrase):
Enter same passphrase again:
Your identification has been saved in C:\Users\Remy/.ssh/id_rsa.
Your public key has been saved in C:\Users\Remy/.ssh/id_rsa.pub.
The key fingerprint is:
SHA256:FSpFs/BY0U8k+kCp6IDW5K4+Lw4RO7kS8c6TrzIXNF8 remy@WIN-EXAMPLESRV
The key's randomart image is:
+---[RSA 2048]----+
|      ..B+o..    |
|   .   B.=.o.    |
|o.+  .o.* .o     |
|.B+o. E. +  .    |
|B.o= .  S .      |
| B.oo            |
|+ *.             |
|=+.o             |
|o*=o.            |
+----[SHA256]-----+
Make sure to enter a passphrase. Create a backup of the folder
(C:\Users\Username\.ssh), if you loose that private key you won't be able to
login anymore.
Remember that private key files are the equivalent of a password should be
protected the same way you protect your password. To help with that, use ssh-
agent to securely store the private keys within a Windows security context,
associated with your Windows login. To do that, start the ssh-agent service as
Administrator (we already did that when installing) and use ssh-add to store
the private key:
ssh-add ~\.ssh\id_rsa
Add the key to another Windows server
Using the following commands we can copy our public key (not the private, never share your private parts) to a server running SSH. I assume you know how to do this on Linux, this example is for another Windows server. The permissions are managed differently.
In this example I use the user remy in the AD domain SPCS. The format then
to login is remy@spcs@example.org, the first part (remy@spcs) is the
username (and AD domain), the last part (@example.org) is the server to
connect to.
Create the folder where the authorized_keyfile belongs:
ssh remy@spcs@example.org mkdir C:\users\remy\.ssh\
Use scp to copy the public key file generated previously:
scp C:\Users\Remy\.ssh\id_ed25519.pub remy@spcs@example.org:C:\Users\remy\.ssh\authorized_keys
# note that my local user (leftmost part) is also remy. The server path is the rightmost part.
Change the permissions on the authorized_keys file on the server, otherwise
ssh will ignore the file:
ssh --% remy@spcs@example.org powershell -c $ConfirmPreference = 'None'; Repair-AuthorizedKeyPermission C:\Users\Remy\.ssh\authorized_keys
Example output:
  [*] C:\Users\Remy\.ssh\authorized_keys

'NT SERVICE\sshd' needs Read access to 'C:\Users\Remy\.ssh\authorized_keys'.
Shall I make the above change?
[Y] Yes  [A] Yes to All  [N] No  [L] No to All  [S] Suspend  [?] Help (default is "Y"): y
'NT SERVICE\sshd' now has Read access to 'C:\Users\Remy\.ssh\authorized_keys'.
      Repaired permissions
The OpenSSHUtils powershell module needs to be installed for the Repair-
AuthorizedKeyPermission cmdlet to work.
Install-Module -Force OpenSSHUtils -Scope AllUsers
You can now login to the Windows server using your private key.
Windows OpenSSH server
The Windows OpenSSH server is quite simple to configure. It has the regular
sshd_config file for settings, with some parts specific to Windows.
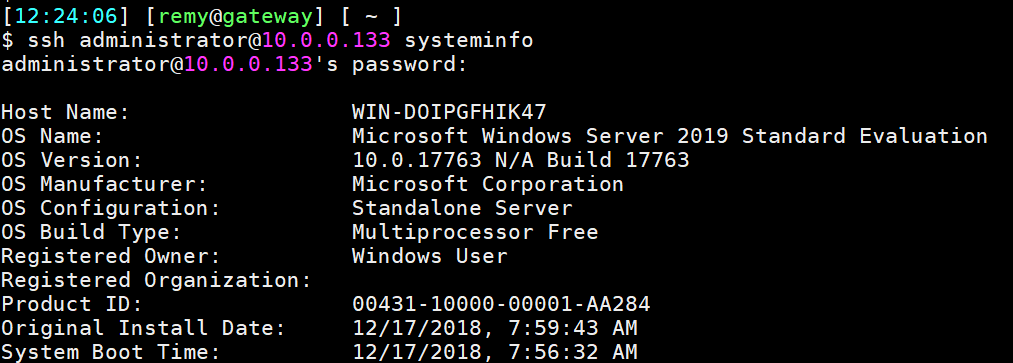
This is a screenshot where I SSH into a Windows server using my linux workstation:
OpenSSH server configuration
This section is specifically for Windows related settings. I assume you know how to configure openssh on linux.
The server reads it's configuration from %programdata%\ssh\sshd_config. You
can copy and paste that path into a Windows Run dialog (WIN+R) to open
Explorer in the correct location.
When configuring user/group based rules with a domain user or group, use the
following format: user?domain*. Windows allows multiple of formats for
specifying domain principals, but many will conflict with standard Linux
patterns. For that reason, * is added to cover FQDNs. Also, this approach uses
? instead of @ avoids conflict with the username@host format.
To allow all users from the domain EXAMPLE in group Domain Admins to login
via SSH:
AllowGroups "EXAMPLE\Domain Admins"
It's better to create a specific security group (e.g. sshusers) and add the
Domain Admins as a member. With a seperate group you can give or restrict the
ssh permissions more granulary.
To allow local users (non-domain) or local groups:
AllowUsers localuser@192.168.2.23
AllowGroups sshusers
PermitRootLogin on Windows
PermitRootLogin is not applicable in Windows. To deny administrators from
logging in via SSH, use a DenyGroups directive:
DenyGroups Administrators
For Windows OpenSSH, the only available authentication methods are password
and publickey.
At the bottom of this article there is an alternative to sudo. How otherwise
would you elevate permissions? Do note that it is quite complex.
AuthorizedKeysFile location on Windows
The default AuthorizedKeysFile locations are .ssh/authorized_keys and
.ssh/authorized_keys2. This is in the users home folder (C:\Users\Username)
(or the profile image path). If required, an absolute path can be provided
(D:\folder\authorized_keys).
Tips and tricks
Here are a few tips on Windows and SSH I found while using it for some time.
ssh-copy-id
From a linux machine, the command ssh-copy-id can be used to copy your public key easily to another linux machine. This does not work on Windows:
$ ssh-copy-id administrator@10.0.0.133
/usr/bin/ssh-copy-id: INFO: attempting to log in with the new key(s), to filter out any that are already installed
/usr/bin/ssh-copy-id: INFO: 1 key(s) remain to be installed -- if you are prompted now it is to install the new keys
administrator@10.0.0.133's password:
'exec' is not recognized as an internal or external command,
operable program or batch file.
'cat' is not recognized as an internal or external command,
operable program or batch file.
The system cannot find the path specified.
You need to use the above commands listed under the SSH client section to copy the key and fix the permissions.
sudo
As you've denied access to Administrators via SSH (just as you would not allow
root login on Linux), you now need to have a way for people to elevate their
permissions. On linux you would use sudo su - or the likes. On Windows, there
is no sudo. There is also no way to elevate permissions of an already running
process.
Using the runas command fails because it cannot create a new window or ask UAC
(because you're in a console SSH session).
There is a complex way of elevating your privileges. You need to run this in a
powershell session as your user. First you create a Credentials object which
has the username and password of the Administrator user. Then you use that
$Cred object with either Invoke-Command to run a single noninteractive
command, or with Enter-PSSession to get an interactive Powershell.
Note that you first need to ssh into your windows server and start powershell.
This can be done with one command:
ssh user@windows.example.org powershell
Non-interactive example:
$Username = 'Administrator'
$Password = 'P@ssw0rd'
$pass = ConvertTo-SecureString -AsPlainText $Password -Force
$Cred = New-Object System.Management.Automation.PSCredential -ArgumentList $Username,$pass

Invoke-Command -Credential $Cred -ComputerName localhost -scriptblock { cmd.exe /c whoami }
Example output:
win-doipgfhik47\administrator
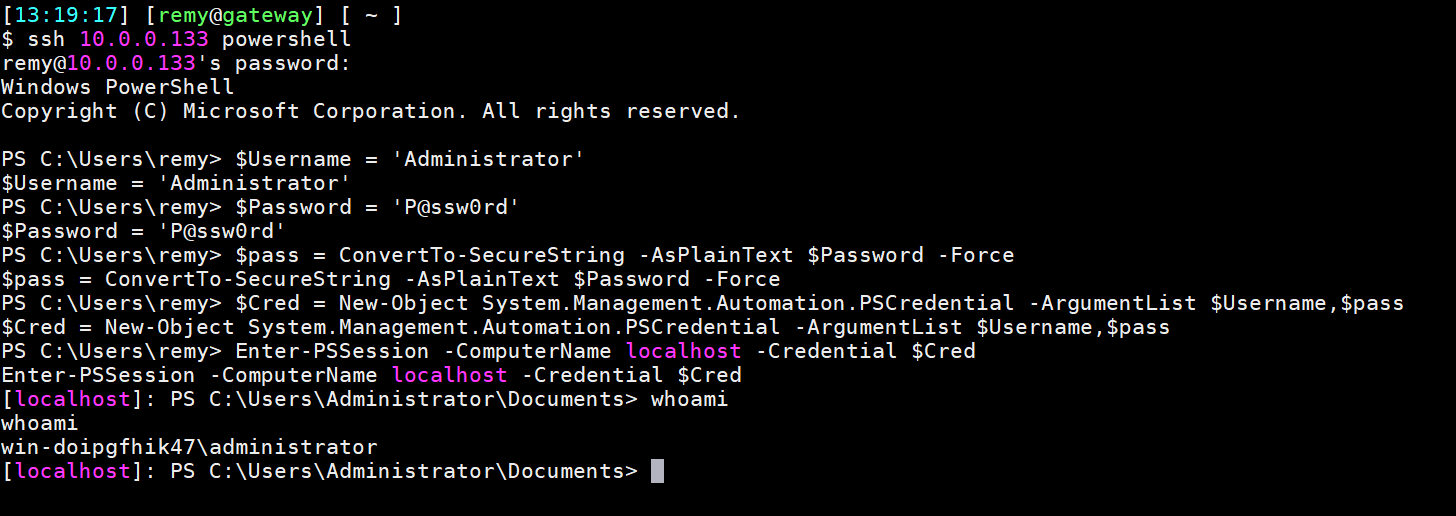
Interactive shell example:
$Username = 'Administrator'
$Password = 'P@ssw0rd'
$Pass = ConvertTo-SecureString -AsPlainText $Password -Force
$Cred = New-Object System.Management.Automation.PSCredential -ArgumentList $Username,$Pass

Enter-PSSession -ComputerName localhost -Credential $Cred
Example output:
[localhost]: PS C:\Users\Administrator\Documents> whoami
win-doipgfhik47\administrator
This is a screenshot of the entire process:
Note that this by default only works on localhost, not from a remote computer.
Unless you change the trustedhosts you will get an Access denied error.
This is also not really like sudo, but more like setting up a new ssh session
from localhost to localhost as root. (But, with powershell remoting).