Raymii.org

Quis custodiet ipsos custodes?Home | About | All pages | Cluster Status | RSS Feed
Broken Corrupted Raspberry Pi SD Card
Published: 09-01-2015 | Last update: 13-11-2019 | Author: Remy van Elst | Text only version of this article
❗ This post is over five years old. It may no longer be up to date. Opinions may have changed.
Table of Contents
One of my Raspberry Pi's would not boot up after a reboot. The SD card was corrupted, sadly beyond repair. This article walks you through the steps I took to try to fix the SD card, including fsck, badblocks and other filesystem utilities. It also has tips to reduce the writing on the Raspberry Pi, this to save SD cards from some amount of wear and thus possible corruption.
Recently I removed all Google Ads from this site due to their invasive tracking, as well as Google Analytics. Please, if you found this content useful, consider a small donation using any of the options below. It means the world to me if you show your appreciation and you'll help pay the server costs:
GitHub Sponsorship
PCBWay referral link (You get $5, I get $20 after you've placed an order)
Digital Ocea referral link ($200 credit for 60 days. Spend $25 after your credit expires and I'll get $25!)
The machine was running as an FM transmitter so that my regular sound system could play podcasts (Please note that it is probably illegal to transmit without having your HAM license). I't would sync up my feeds and, when turned on, started playing them.
However, after the last reboot it would not start up again. I rigged up the UART to my machine and found out why, there were files that the system could not read, therefore init would not boot up.
2019-11-13: update the fstab entries to use tmpfs instead of none, and add correct permissions.
fsck
The file system consistency check utility most of the time is able to find and recover damaged filesystems. My systems do a filesystem check at every boot, and they get a reboot regularly. The SD card has an ext4 filesystem and is 16 GB in size.
Since most of the time you can fix broken filesystems with an fsck I hooked up the card to my machine and started the fsck:
# fsck /dev/mmcblk0p2
And it failed right away:
fsck from util-linux 2.25.2
e2fsck 1.42.12 (29-Aug-2014)
fsck.ext4: Filesystem revision too high while trying to open /dev/mmcblk0p2
The filesystem revision is apparently too high for this version of e2fsck.
(Or the filesystem superblock is corrupt)


The superblock could not be read or does not describe a valid ext2/ext3/ext4
filesystem.  If the device is valid and it really contains an ext2/ext3/ext4
filesystem (and not swap or ufs or something else), then the superblock
is corrupt, and you might try running e2fsck with an alternate superblock:
    e2fsck -b 8193 <device>
 or
    e2fsck -b 32768 <device>
The superblock contains information about the file system such as the file system type, size, status, information about other metadata structures, block counts, inode counts, supported features, maintenance information, and more and so on (source). It is an important piece of information for the filesystem.
So the card is so broken that the first superblock is not readable. An ext4 filesystem has multiple copies of it's superblock, so lets find them and use them to try the fsck again. To find the other superblocks we can use the following command:
mke2fs -n /dev/mmcblk0p2
Output
mke2fs 1.42.12 (29-Aug-2014)
/dev/mmcblk0p2 contains a ext4 file system
Proceed anyway? (y,n) y
Creating filesystem with 3794688 4k blocks and 950272 inodes
Filesystem UUID: a56c8a06-9907-41a2-86a0-dd601212880b
Superblock backups stored on blocks:
        32768, 98304, 163840, 229376, 294912, 819200, 884736, 1605632, 2654208
We also need to find the block size, the above command shows it as 4k, which is 4096. With this information we can retry the fsck with the alternate superblock:
fsck -b 163840 -B 4096 /dev/mmcblk0p2
Where -b is the alternative superblock and -B is the blocksize.
It didn't help much, after a lot of questions I decided to automatically fix everything it found:
fsck from util-linux 2.25.2
e2fsck 1.42.12 (29-Aug-2014)
Superblock has an invalid journal (inode 8).
Clear<y>? yes
*** ext3 journal has been deleted - filesystem is now ext2 only ***

Resize inode not valid.  Recreate<y>? yes
Pass 1: Checking inodes, blocks, and sizes
yInode 1 has EXTENTS_FL flag set on filesystem without extents support.
Clear<y>? yes
Root inode has dtime set (probably due to old mke2fs).  Fix<y>? yes
Quota inode is not in use, but contains data.  Clear<y>? yes
Quota inode is not in use, but contains data.  Clear<y>? yes
Inode 5, i_size is 2305843009213693952, should be 0.  Fix<y>? yes
Inode 5, i_blocks is 131072, should be 0.  Fix<y>? yes
Reserved inode 6 (<The undelete directory inode>) has invalid mode.  Clear<y>? yes
Inode 6 has a bad extended attribute block 2064.  Clear<y>? yes
Inode 6, i_size is 666532745924706320, should be 0.  Fix<y>? yes
Journal inode is not in use, but contains data.  Clear<y>? yes
Reserved inode 9 (<Reserved inode 9>) has invalid mode.  Clear<y>? yes
Reserved inode 10 (<Reserved inode 10>) has invalid mode.  Clear<y>?
Recreate journal<y>? cancelled!
/dev/mmcblk0p2: e2fsck canceled.

/dev/mmcblk0p2: ***** FILE SYSTEM WAS MODIFIED *****
Adding the -y option to the command will automatically answer yes to
everything:
fsck -y -b 163840 -B 4096 /dev/mmcblk0p2
Scratch Files
This goes well for a while, but fails after some time with the following error:
Error storing directory block information (inode=5542, block=0, num=33754683): Memory allocation failed

/dev/mmcblk0p2: ***** FILE SYSTEM WAS MODIFIED *****
Recreate journal? yes

Creating journal (32768 blocks):  Done.

*** journal has been re-created - filesystem is now ext3 again ***
e2fsck: aborted
Searching around on the web results in multiple topics suggesting to add the following:
[scratch_files]
directory = /var/cache/e2fsck
To the file /etc/e2fsck.conf. The man page describes it like so:
   [scratch_files]
      This  stanza  controls  when  e2fsck will attempt to use scratch
      files to reduce the need for memory.
Ted Tso explains what this option does on this mailinglist topic:
This will cause e2fsck to store certain data structures which grow large with backup servers that have a vast number of hard-linked files in /var/cache/e2fsck instead of in memory. This will slow down e2fsck by approximately 25%, but for large filesystems where you couldn't otherwise get e2fsck to complete because you're exhausting the 2GB VM per-process limitation for 32-bit systems, it should allow you to run through to completion.
You have to create the /var/cache/e2fsck folder if it does not exist yet
before running the fsck:
mkdir -p /var/cache/e2fsck
The scratch_files stanza has more options, two of which might be important,
set dirinfo and set icount.
You configure set dirinfo to false if your filesystem had an large number of
individual files and not that many directories. You configure set icount to
false if the reverse were true. Otherwise, you configure them both on true.
There was also a good explanation of where the Out of Memory error comes from on Stack Exchange, it might not be out of memory.
The scratch_files setting did not improve the check. It still gave the same
error, out of memory.
Even after playing with the dirinfo settings, or adding a 200 GB swapfile the
fsck would still fail. dmesg was also full with these kinds of logs:
[12343.5678] end_request: I/O error, dev mmcblk0, sector 50944
Spinrite
My last guess would be to try Spinrite. Spinrite is a hard drive recovery and maintenande utility written by Steve Gibson from Gibson Research Corporation. I configured a KVM VM with the card reader device as a second block device and tried to run Spinrite on Level 2. However, even spinrite failed:
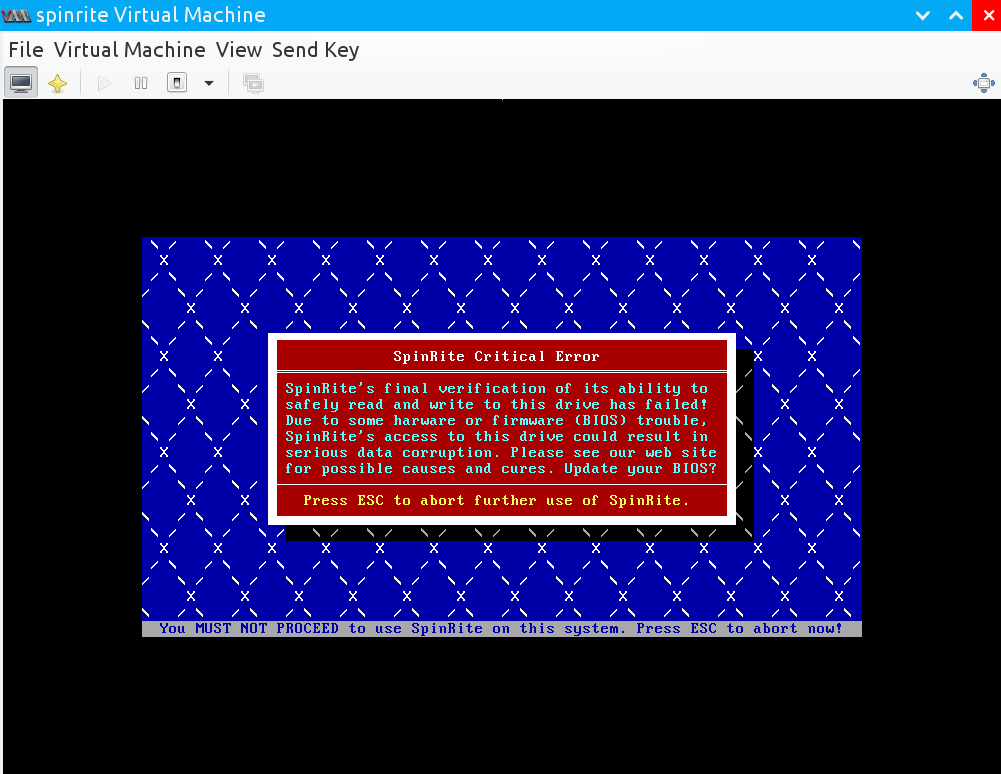
Booting Spinrite on a spare laptop with a cardreader with this SD card gave the same error. It sees the device, but fails to run on it.
Spinrite has helped me multiple times recover drives, but this one might be to much for it.
Badblocks
Badblocks is a *NIX utility to search for bad blocks on a device. While it is not usefull for creating a list of bad blocks on the SD card because SD cards do not report actual physical addresses (because of wear levelling) it does tell us if the card is broken or not.
The following badblocks command will scan and report bad blocks for the device. It is a destructive write operation, you will lose your data.
badblocks -o ./badblocks.list -w -s -v -b 4096 -c 16 /dev/mmcblk0
-o to output the badblocks list to the file ./badblocks.list, -w for the
write operation, -s to show progress, -v to be verbose, -b 4096 for the
blocksize of 4K and -c 16 to test 16 blocks at once (default is 64).
It showed me that a lot of writes were failing:
Checking for bad blocks in read-write mode
From block 0 to 3799039
Testing with pattern 0xaa: 0.01% done, 1:57 elapsed. (0/292/0 errors)
^C
Interrupted at block 294
The error output format means the following:
number of read errors/number of write errors/number of corruption errors
So most of the writes (292 of 294) failed, meaning the SD card is broken, beyond repair I guess.
Less writing
This SD card is a lost case. To prevent your Raspberry Pi's from writing a lot of data, and thus, wearing the SD card, you can do a couple of things.
tmpfs
The first one is to mount a few folders in RAM as tmpfs. The folders are the
folders where temp files and logging is written to. This means that you won't
have syslog available, but most of the time that is not a problem.
Edit /etc/fstab and add the following:
tmpfs    /tmp               tmpfs    defaults,noatime,nosuid,size=100m                  0 0
tmpfs    /var/tmp           tmpfs    defaults,noatime,nosuid,size=30m                   0 0
tmpfs    /var/log           tmpfs    defaults,noatime,nosuid,mode=0755,size=100m        0 0
tmpfs    /var/run           tmpfs    defaults,noatime,nosuid,mode=0755,size=2m          0 0
This will mount the above folders in RAM, with a respectable max size (otherwise
your ram fills up). The noatime option means that the access time of a file is
not updated, saving a lot of writes as well. You should also add the noatime
option to your other partitions, for example on a standard Raspbian:
proc            /proc           proc    defaults          0       0
/dev/mmcblk0p1  /boot           vfat    ro,noatime        0       2
/dev/mmcblk0p2  /               ext4    defaults,noatime  0       1
Here the /boot partition is also mounted read only (ro). The noatime
option is added.
Issue a mount -a command or reboot the machine to make this active.
Disable swap
Linux divides its physical RAM (random access memory) into chucks of memory called pages. Swapping is the process whereby a page of memory is copied to the preconfigured space on the hard disk, called swap space, to free up that page of memory. The combined sizes of the physical memory and the swap space is the amount of virtual memory available.
Swappig causes a lot of writes to the SD card. You would want to turn it off to save writes. The downside of this is that when there is not enough RAM available the linux OOM killer will randomly kill processes to save RAM.
Raspbian by default has a swap file, dynamically managed by the dphsys-
swapfile utility. You can turn off this utility by issueing the following
commands:
dphys-swapfile swapoff
dphys-swapfile uninstall
update-rc.d dphys-swapfile remove
After a reboot the swap will be gone, which you can check with the free -m
command:
             total       used       free     shared    buffers     cached
Mem:           484        243        241          0         42        162
-/+ buffers/cache:         38        446
Swap:            0          0          0
fsck at every boot
My Raspberry Pi's have a cronjob which reboots them once every seven days. This to apply kernel updates and just a general good procedure to see if all still works after a reboot. By default, fsck checks a filesystem every 30 boots (counted individually for each partition). I decided to change this to every boot, so problems will be found and possibly fixed earlier.
To set up an fsck at every boot, execute the following command:
tune2fs -c 1 /dev/sda1
Where /dev/sda1 is the device or partition.
Remove the GUI
I don't use the Raspbian GUI so I decided to remove everything GUI related. The
best way to do this is to remove libx11 and all it's dependencies, that being
all the GUI applications:
apt-get purge --auto-remove 'libx11-.*'
This lowers the amount of disk space used, the amount of packages updated and the amount of services running on the machine, saving both RAM and disk space.
Conclusion
This SD card was so corrupt I threw it away. The Raspberry Pi was reinstalled
and the pifm software was set up again. The music came from another machine,
so that did not have to be copied again.
With the tips above you might be able to save your SD card if it ever gets corrupted. These tips also work on regular disks and SSD's.
Tags: badblocks , blog , ext4 , filesystem , fsck , mkfs , raspberry-pi , sd , swap