Raymii.org

Quis custodiet ipsos custodes?Home | About | All pages | Cluster Status | RSS Feed
Use the Nitrokey HSM or SmartCard-HSM with mod_nss and Apache
Published: 21-06-2016 | Author: Remy van Elst | Text only version of this article
❗ This post is over eight years old. It may no longer be up to date. Opinions may have changed.
Table of Contents
This is a guide on using the Nitrokey HSM with mod_nss and the Apache
webserver. The HSM allows you to store the private key for a SSL certificate
inside the HSM (instead of on the filesystem), so that it can never leave the
device and thus never be stolen.
The guide covers the installation and configuration of mod_nss, coupling the
HSM to NSS, generating the keys and configuring Apache, and last but not least
we also do some benchmarks on Apache with the HSM and different key sizes.
Recently I removed all Google Ads from this site due to their invasive tracking, as well as Google Analytics. Please, if you found this content useful, consider a small donation using any of the options below. It means the world to me if you show your appreciation and you'll help pay the server costs:
GitHub Sponsorship
PCBWay referral link (You get $5, I get $20 after you've placed an order)
Digital Ocea referral link ($200 credit for 60 days. Spend $25 after your credit expires and I'll get $25!)
Introduction
The Nitrokey HSM in a sealed package
The Nitrokey HSM is an open hardware and open software device. It is a USB version of the SmartCard-HSM. Both the SmartCard-HSM as the Nitrokey HSM have sources available and are fully supported by the OpenSC project.
If you are new to the NitroKey HSM/SmartCard HSM, please also read my getting started article. It explains what the HSM is, how to set it up and how to use it with OpenSSH for example.
I have multiple articles on this nice device, so make sure to read the others as well.
The SmartCard-HSM
In this entire tutorial I will be using slot 1 and ID 1 of the Nitrokey HSM. The
User PIN is 648219 as in all the examples. It is very important to read my
tutorial to get started with the Nitrokey HSM first as that explains a lot
of concepts and usage. The guide was tested on both Arch Linux and Ubuntu 16.04,
both with the available latest version of Apache 2.4.
The default mod_ssl of Apache has no support for the PKCS#11 protocol. PKCS#11
is the protocol HSM's use to communicate their crypto operations. Instead of the
software using the private keyfiles directly themselves, they ask the HSM things
like "hey, here's some data, sign/encrypt that please with key X", which then
the HSM does that and returns the result of the requested action.
mod_ssl does support the SSLCryptoDevice, but the documentation states
that it only enables use of a cryptographic hardware accelerator board to
offload some of the SSL processing overhead. The Nitrokey HSM uses the
OpenSC projects code, and they do have a openssl engine wrapper but
I could not find any documentation and small tests resulted in nothing.
mod_nss however does support PKCS#11. The website of mod_nss tells us
that it is an SSL provider derived from the mod_ssl module for the Apache web
server that uses the Network Security Services (NSS) libraries. For the most
part there is a 1-1 mapping between the capabilities of mod_nss and mod_ssl.
The management of mod_nss is different from the usual with mod_ssl. You need
to use the nss tools like certutil and modutil for certificate management,
no more simple files.
This is a good guide on certutil and here is more documentation on
certutil. The man page also helps. Here is a list with copy paste
actions for the NSS suite.
mod_nss installation
In Ubuntu you can install the mod_nss Apache module with the following
command:
apt-get install libapache2-mod-nss apache2 libpkcs11-helper1 libengine-pkcs11-openssl libnss3-tools opensc-pkcs11
You enable the module with the following command:
a2enmod nss
Disable mod_ssl with the folllowing command:
a2dismod ssl
On other Linux distro's you might need to manually change config files. On my
Arch installation I had to add the following to /etc/http/conf/http.conf:
Include conf/extra/nss.conf
I also had to install mod_nss from the AUR:
pacaur -Sy mod_nss
NSS and Certutil config
NSS requires a certificate database. We also need to tell NSS to load the
pkcs11 module.
Create the database folder:
mkdir -p /etc/nss/db/
Create a new NSS database:
certutil -N -d /etc/nss/db/
It will ask you for a password. Enter a secure one, or, when testing, just pres RETURN twice. Output:
Enter a password which will be used to encrypt your keys.
The password should be at least 8 characters long,
and should contain at least one non-alphabetic character.

Enter new password:
Re-enter password:
Add the HSM module to NSS:
modutil -add pkcs11 -libfile /usr/lib/opensc-pkcs11.so -dbdir /etc/nss/db/
On Ubuntu the file is located here:
/usr/lib/x86_64-linux-gnu/opensc-pkcs11.so
Output:
WARNING: Performing this operation while the browser is running could cause
corruption of your security databases. If the browser is currently running,
you should exit browser before continuing this operation. Type
'q <enter>' to abort, or <enter> to continue:

Module "pkcs11" added to database.
Enable the pkcs11 module:
modutil -enable pkcs11 -dbdir /etc/nss/db/
Output:
WARNING: Performing this operation while the browser is running could cause
corruption of your security databases. If the browser is currently running,
you should exit browser before continuing this operation. Type
'q <enter>' to abort, or <enter> to continue:

Slot "Virtual hotplug slot" enabled.
Slot "Nitrokey Nitrokey HSM (010000000000000000000000) 00 00" enabled.
HSM Key generation and NSS usage
![]()
Generate a 2048 bit RSA key in the HSM:
pkcs11-tool --module opensc-pkcs11.so --login --pin 648219 --keypairgen --key-type rsa:2048 --id 1 --label "httpd hsm"
Generate a new certificate with that key. This one is self signed. See my
tutorial on the Nitrokey if you want to generate a CSR and what to put in
hsm.conf:
OPENSSL_CONF=./hsm.conf openssl req -engine pkcs11 -keyform engine -new -key 1:1 -nodes -days 3560 -x509 -sha256 -out "rsahsm.tst.raymii.org.pem" -subj "/C=NL/ST=Zuid Holland/L=Rotterdam/O=Sparkling Network/OU=IT Dept/CN=rsahsm.tst.raymii.org"
Do note that you can also generate a CSR and submit that to your certificate provider.
Convert the PEM certificate into DER format, since DER is what the HSM uses:
openssl x509 -in rsahsm.tst.raymii.org.pem -out rsahsm.tst.raymii.org.der -outform der
Load the DER certificate into the HSM together with the key:
pkcs11-tool --module opensc-pkcs11.so --login --pin 648219 --write-object rsahsm.tst.raymii.org.der --type cert --id 1 --label 'httpdcert'
Output:
Using slot 1 with a present token (0x1)
Created certificate:
Certificate Object, type = X.509 cert
  label:      httpdcert
  ID:         01
Find out the correct names for the HSM. The tooling is very picky about naming, it took me quite a while to figure it out:
modutil -dbdir /etc/nss/db/ -list pkcs11
We're looking for the Token Name. Example Output:
-----------------------------------------------------------
Name: pkcs11
Library file: /usr/lib/opensc-pkcs11.so
Manufacturer: OpenSC (www.opensc-project.org)
Description: Smart card PKCS#11 API
PKCS #11 Version 2.20
Library Version: 0.0
Cipher Enable Flags: None
Default Mechanism Flags: None

Slot: Nitrokey Nitrokey HSM (010000000000000000000000) 00 00
Slot Mechanism Flags: None
Manufacturer: OpenSC (www.opensc-project.org)
Type: Hardware
Version Number: 0.0
Firmware Version: 0.0
Status: Enabled
Token Name: SmartCard-HSM (UserPIN)
Token Manufacturer: www.CardContact.de
Token Model: PKCS#15 emulated
Token Serial Number: DENK0100186
Token Version: 24.13
Token Firmware Version: 2.0
Access: NOT Write Protected
Login Type: Login required
User Pin: Initialized
In this case the Token name is: SmartCard-HSM (UserPIN). Now we want to know
the exact certificate name. Find that using the following command:
certutil -d /etc/nss/db -h 'SmartCard-HSM (UserPIN)' -L
(-L is list all certificates. -h indicats the specific token we want to
use.)
Certificate Nickname    Trust Attributes
                        SSL,S/MIME,JAR/XPI

Enter Password or Pin for "SmartCard-HSM (UserPIN)": 648219
SmartCard-HSM (UserPIN):httpdcert                          u,u,u
In this case the name of the certificate is: SmartCard-HSM
(UserPIN):httpdcert.
View the PEM certificate:
certutil -d /etc/nss/db -h 'SmartCard-HSM (UserPIN)' -L -n "SmartCard-HSM (UserPIN):httpdcert" -a
(-n names the specific certificate we want to list/show. -a enables ASCII
output.)
Output:
Enter Password or Pin for "SmartCard-HSM (UserPIN)": 648219
-----BEGIN CERTIFICATE-----
MIIDcjCCAloCCQCxS7T+z2D3ADANBgkqhkiG9w0BAQsFADB7MQswCQYDVQQGEwJO
TDEVMBMGA1UECAwMWnVpZCBIb2xsYW5kMRIwEAYDVQQHDAlSb3R0ZXJkYW0xGjAY
BgNVBAoMEVNwYXJrbGluZyBOZXR3b3JrMRAwDgYDVQQLDAdJVCBEZXB0MRMwEQYD
[...]
-----END CERTIFICATE-----
(-n names a specific certificate.)
If you omit the -a option you will get the regular text output:
certutil -d /etc/nss/db -h 'SmartCard-HSM (UserPIN)' -L -n "SmartCard-HSM (UserPIN):httpdcert"
Output:
Enter Password or Pin for "SmartCard-HSM (UserPIN)": 648219
Certificate:
Data:
Version: 1 (0x0)
Serial Number:
00:b1:4b:b4:fe:cf:60:f7:00
Signature Algorithm: PKCS #1 SHA-256 With RSA Encryption
Issuer: "CN=rsahsm.tst.raymii.org,OU=IT Dept,O=Sparkling Network,L=Rotterdam,ST=
Zuid Holland,C=NL"
Validity:
Not Before: Mon Jun 20 17:13:55 2016
Not After : Fri Mar 20 17:13:55 2026
Subject: "CN=rsahsm.tst.raymii.org,OU=IT Dept,O=Sparkling Network,L=Rotterdam,ST=Zuid Holland,C=NL"
[...]
Check the certificate chain with certutil:
certutil -d /etc/nss/db -h SmartCard-HSM -O -n "SmartCard-HSM (UserPIN):httpdcert"
(-O prints the certificate chain.)
Example Output:
Enter Password or Pin for "SmartCard-HSM (UserPIN)": 648219
"SmartCard-HSM (UserPIN):httpdcert" [CN=rsahsm.tst.raymii.org,OU=IT Dept,O=Sparkling Network,L=Rotterdam,ST=Zuid Holland,C=NL]
If you use a self-signed certificate it will be just one line. If you have an official certificate it will show the full chain:
"COMODORSAAddTrustCA" [CN=COMODO RSA Certification Authority,O=COMODO CA Limited,L=Salford,ST=Greater Manchester,C=GB]
"COMODORSADomainValidationSecureServerCA" [CN=COMODO RSA Domain Validation Secure Server CA,O=COMODO CA Limited,L=Salford,ST=Greater Manchester,C=GB]
"SmartCard-HSM (UserPIN):webrsa2048" [CN=rsa2048hsm.tst.raymii.org,OU=PositiveSSL,OU=Domain Control Validated]
If it doesn't show the full chain you might need to import root certificates in the NSS database.
Import Root CA Chains
To make sure the correct certificate chain is sent we need to import root certificates in our NSS database. If you use a self signed certificate then you won't need to do this, but if you use an actual signed certificate by a CA you need to do this.
The curl project has a good Root CA Chain. Download it:
mkdir ssl
cd ssl
wget https://curl.haxx.se/ca/cacert.pem
We need to remove all the comments from the file and just keep the chains. Use the following command to do so:
sed -n '/-----BEGIN/,/-----END/p' cacert.pem > chains.pem
Now split the file into all seperate files:
csplit -f cert- chains.pem '/-----BEGIN CERTIFICATE-----/' '{*}'
That creates a lot of files named cert-###.
Import the seperate chains with certutil:
for file in ./cert-*; do
echo $file;
certutil -d /etc/nss/db -A -n "${file}" -t "CT,," -a -i ./${file};
sleep 1
done
The -t "CT,," flags make sure the certificates are trusted. (+ T - Trusted CA
to issue client certificates, C - Trusted CA to issue server certificates). The
-A flag adds an existing certificate to the DB. The sleep is added to make
sure everything is imported and the HSM is not overloaded.
If you just need to import one (PEM) certificate use the following command, this
example is for the Addtrust External Root CA:
certutil -d /etc/nss/db -A -n 'ADDTUST' -t "CT,," -a -i addtrust.pem
Apache2 and mod_nss config
Place the PIN for the slot in this file:
cat /etc/nss/db/pin.txt
SmartCard-HSM (UserPIN):648219
The format is: tokenname:pin.
Also make sure to give the correct permissions to the NSS db:
chown -R http:root /etc/nss/db/
If http is not your apache user, change it to the correct username. Otherwise
your apache error log will fill up with errors like:
[:error] [pid 4873:tid 139841160738688] NSS_Initialize failed. Certificate database: /etc/nss/db.
[:error] [pid 4873:tid 139841160738688] SSL Library Error: -8038 SEC_ERROR_NOT_INITIALIZED
Make sure you have disabled mod_ssl in the Apache configuration and have
enabled mod_nss. This is my nss.conf file:
# grep -v -e "#" -e '^$' /etc/httpd/conf/extra/nss.conf
LoadModule nss_module modules/libmodnss.so
Listen 8443
AddType application/x-x509-ca-cert .crt
AddType application/x-pkcs7-crl .crl
NSSPassPhraseDialog file:/etc/nss/db/pin.txt
NSSPassPhraseHelper /usr/bin/nss_pcache
NSSEnforceValidCerts off
NSSSessionCacheTimeout 100
NSSSession3CacheTimeout 86400
NSSRandomSeed startup builtin
NSSRenegotiation off
NSSRequireSafeNegotiation off
<VirtualHost _default_:8443>
DocumentRoot "/etc/httpd/htdocs"
ServerName rsahsm.tst.raymii.org:8443
ErrorLog /etc/httpd/logs/error_log
TransferLog /etc/httpd/logs/access_log
LogLevel info
NSSEngine on
NSSCipherSuite ALL
NSSProtocol TLSv1.0,TLSv1.1,TLSv1.2
NSSNickname "SmartCard-HSM (UserPIN):httpdcert"
NSSCertificateDatabase /etc/nss/db
<Files ~ "\.(cgi|shtml|phtml|php3?)$">
NSSOptions +StdEnvVars
</Files>
<Directory "/var/www/cgi-bin">
NSSOptions +StdEnvVars
</Directory>
</VirtualHost>
On Arch I had to comment out NSSSessionCacheSize and replace
NSSPassPhraseHelper /usr/libexec/nss_pcache with NSSPassPhraseHelper
/usr/bin/nss_pcache. For the testing certificate I also had to add
NSSEnforceValidCerts off. The rest is just the example config.
Make sure the certificate name is correct here:
NSSNickname "SmartCard-HSM (UserPIN):httpdcert"
A manual test shows that it works:
curl -kI https://127.0.0.1:8443
Output:
HTTP/1.1 200 OK
Date: Mon, 20 Jun 2016 19:06:03 GMT
Server: Apache/2.4.20 (Unix) mod_nss/2.4.20 NSS/3.23 Basic ECC
Last-Modified: Mon, 20 Jun 2016 19:05:33 GMT
ETag: "f-535ba6383fe65"
Accept-Ranges: bytes
Content-Length: 15
Content-Type: text/html
OpenSSL also agrees:
echo | openssl s_client -servername raymii.org -connect 127.0.0.1:8443
Output:
CONNECTED(00000003)
depth=0 C = NL, ST = Zuid Holland, L = Rotterdam, O = Sparkling Network, OU = IT Dept, CN = raymii.org
verify error:num=18:self signed certificate
verify return:1
depth=0 C = NL, ST = Zuid Holland, L = Rotterdam, O = Sparkling Network, OU = IT Dept, CN = raymii.org
verify return:1
---
Certificate chain
0 s:/C=NL/ST=Zuid Holland/L=Rotterdam/O=Sparkling Network/OU=IT Dept/CN=raymii.org
i:/C=NL/ST=Zuid Holland/L=Rotterdam/O=Sparkling Network/OU=IT Dept/CN=raymii.org
---
And below is a screenshot of a signed certificate from Comodo (via Xolphin), with the private key on the HSM:
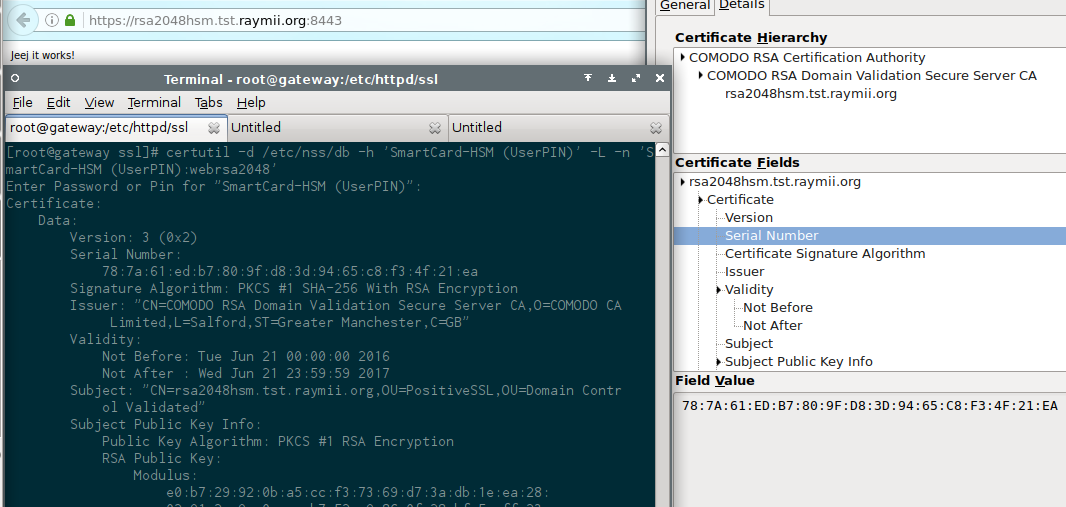
Just to show that it will work with all major browsers. No trust issues or exceptions here.
Here's the command line to show that the chain is also included:
echo | openssl s_client -servername raymii.org -connect rsa2048hsm.tst.raymii.org:8443
Output:
CONNECTED(00000003)
depth=2 C = GB, ST = Greater Manchester, L = Salford, O = COMODO CA Limited, CN = COMODO RSA Certification Authority
verify return:1
depth=1 C = GB, ST = Greater Manchester, L = Salford, O = COMODO CA Limited, CN = COMODO RSA Domain Validation Secure Server CA
verify return:1
depth=0 OU = Domain Control Validated, OU = PositiveSSL, CN = rsa2048hsm.tst.raymii.org
verify return:1
---
Certificate chain
0 s:/OU=Domain Control Validated/OU=PositiveSSL/CN=rsa2048hsm.tst.raymii.org
i:/C=GB/ST=Greater Manchester/L=Salford/O=COMODO CA Limited/CN=COMODO RSA Domain Validation Secure Server CA
1 s:/C=GB/ST=Greater Manchester/L=Salford/O=COMODO CA Limited/CN=COMODO RSA Domain Validation Secure Server CA
i:/C=GB/ST=Greater Manchester/L=Salford/O=COMODO CA Limited/CN=COMODO RSA Certification Authority
2 s:/C=GB/ST=Greater Manchester/L=Salford/O=COMODO CA Limited/CN=COMODO RSA Certification Authority
i:/C=GB/ST=Greater Manchester/L=Salford/O=COMODO CA Limited/CN=COMODO RSA Certification Authority
---
Benchmarking 2048 bit RSA
The Nitrokey HSM is not a fast HSM. I've worked with HSM's that are capable of
multiple hundreds of signs per second, and this HSM is not one that can do that.
But, as we know, that's not the intended target for the device. It's meant for
safe and secure key storage, for example to encrypt files or protect SSH or
S/MIME keys. I did a few siege benchmarks, and as you can see it is quite
slow.
The page that was being loaded is a plain text file containing only the text
Jeej it works!.
A siege test with 5 concurrent users, 30 seconds:
siege -c5 -d5 -t30S https://127.0.0.1:8443
Output:
** SIEGE 4.0.1
** Preparing 5 concurrent users for battle.
The server is now under siege...
HTTP/1.1 200 2.95 secs: 15 bytes ==> GET /
HTTP/1.1 200 5.73 secs: 15 bytes ==> GET /
[...]
Lifting the server siege...
Transactions: 35 hits
Availability: 100.00 %
Elapsed time: 29.39 secs
Data transferred: 0.00 MB
Response time: 1.95 secs
Transaction rate: 1.19 trans/sec
Throughput: 0.00 MB/sec
Concurrency: 2.32
Successful transactions: 35
Failed transactions: 0
Longest transaction: 4.76
Shortest transaction: 0.74
That's quite reasonable.
A siege test with 10 concurrent users, 30 seconds:
siege -c10 -d5 -t30S https://127.0.0.1:8443
Output:
Transactions: 39 hits
Availability: 100.00 %
Elapsed time: 29.54 secs
Data transferred: 0.00 MB
Response time: 4.64 secs
Transaction rate: 1.32 trans/sec
Throughput: 0.00 MB/sec
Concurrency: 6.13
Successful transactions: 39
Failed transactions: 0
Longest transaction: 17.85
Shortest transaction: 0.75
It starts taking longer.
Comparing the above siege to a test against raymii.org, with all the assets
and such loaded:
siege -c10 -d5 -t30S https://raymii.org/s/
Output:
Transactions: 258 hits
Availability: 100.00 %
Elapsed time: 29.15 secs
Data transferred: 4.42 MB
Response time: 0.73 secs
Transaction rate: 8.85 trans/sec
Throughput: 0.15 MB/sec
Concurrency: 6.45
Successful transactions: 258
Failed transactions: 0
Longest transaction: 2.25
Shortest transaction: 0.18
At 20 connections failures start to occur:
siege -c20 -d5 -t30S https://127.0.0.1:8443
Output:
[...]
[error] Failed to make an SSL connection: 5
HTTP/1.1 200 3.48 secs: 15 bytes ==> GET /
[error] Failed to make an SSL connection: 5
Transactions: 26 hits
Availability: 72.22 %
Elapsed time: 29.65 secs
Data transferred: 0.00 MB
Response time: 8.85 secs
Transaction rate: 0.88 trans/sec
Throughput: 0.00 MB/sec
Concurrency: 7.76
Successful transactions: 26
Failed transactions: 10
Longest transaction: 19.97
Shortest transaction: 0.00
And at 60 concurrent connections in benchmark mode most fail:
siege -c60 -b -t30S https://127.0.0.1:8443
Output:
Transactions: 17 hits
Availability: 48.57 %
Elapsed time: 29.04 secs
Data transferred: 0.00 MB
Response time: 11.28 secs
Transaction rate: 0.59 trans/sec
Throughput: 0.00 MB/sec
Concurrency: 6.60
Successful transactions: 17
Failed transactions: 18
Longest transaction: 20.67
Shortest transaction: 0.00
Comparing it to raymii.org:
siege -c60 -b -t30S https://raymii.org/s/
Output:
Transactions: 539 hits
Availability: 100.00 %
Elapsed time: 29.80 secs
Data transferred: 7.46 MB
Response time: 3.12 secs
Transaction rate: 18.09 trans/sec
Throughput: 0.25 MB/sec
Concurrency: 56.36
Successful transactions: 539
Failed transactions: 0
Longest transaction: 4.87
Shortest transaction: 0.27
As you can see, the HSM and mod_nss isn't that fast, but it is very secure.
The 1 second request overhead comes from the fact that every HTTP request
requires HSM access.
Benchmarking EC keys
Let's try it with an EC key to see if that makes any difference. Generate an EC key in the HSM, using a different ID:
pkcs11-tool --module opensc-pkcs11.so --login -pin 648219 --keypairgen --key-type EC:prime256v1 --id 3 --label "web ecc"
Output:
Using slot 1 with a present token (0x1)
Logging in to "SmartCard-HSM (UserPIN)".
Key pair generated:
Private Key Object; EC
label: web ecc
ID: 03
Usage: sign, derive
Public Key Object; EC EC_POINT 256 bits
EC_POINT: 044104a898bc5e554f28adc3a89df89dd074a1b169e220f1c8050498925aa056f22d69fb63fed3a7cb287b7e2db259762142ca503a3a31b8c53d75944eeb49751ffa1f
EC_PARAMS: 06082a8648ce3d030107
label: web ecc
ID: 03
Usage: verify
Generate a self signed certificate from it. See above to find out what to put in
the hsm.conf file. Do note that id 3 is used:
OPENSSL_CONF=./hsm.conf openssl req -engine pkcs11 -keyform engine -new -key 1:3 -nodes -days 3560 -x509 -sha256 -out "echsm.tst.raymii.org.ec.pem" -subj "/C=NL/ST=Zuid Holland/L=Rotterdam/O=Sparkling Network/OU=IT Dept/CN=echsm.tst.raymii.org"
Convert the PEM file into DER, since the HSM needs a DER file:
openssl x509 -in echsm.tst.raymii.org.pem -out echsm.tst.raymii.org.der -outform der
Load the DER certificate into the HSM together with the key:
pkcs11-tool --module opensc-pkcs11.so --login --pin 648219 --write-object echsm.tst.raymii.org.der --type cert --id 3 --label 'webec'
I gave the certificate object a different label. If we don't do that then
certutil can't differentiate between them.
There should be two certificates now:
certutil -d /etc/nss/db -h 'SmartCard-HSM (UserPIN)' -L
Output:
Certificate Nickname Trust Attributes
SSL,S/MIME,JAR/XPI
Enter Password or Pin for "SmartCard-HSM (UserPIN)": 648219
SmartCard-HSM (UserPIN):httpdcert u,u,u
SmartCard-HSM (UserPIN):webec u,u,u
In the Apache configuration, change the name of the certificate from:
NSSNickname "SmartCard-HSM (UserPIN):httpdcert"
To:
NSSNickname "SmartCard-HSM (UserPIN):webec"
Also change the Ciphersuite to allow ECC ciphers:
NSSCipherSuite +aes_128_sha_256,+aes_256_sha_256,+ecdhe_ecdsa_aes_128_gcm_sha_256,+ecdhe_ecdsa_aes_128_sha,+ecdhe_ecdsa_aes_256_gcm_sha_384,+ecdhe_ecdsa_aes_256_sha,+ecdhe_rsa_aes_128_gcm_sha_256,+ecdhe_rsa_aes_128_sha,+ecdhe_rsa_aes_256_gcm_sha_384,+ecdhe_rsa_aes_256_sha,+rsa_aes_128_gcm_sha_256,+rsa_aes_128_sha,+rsa_aes_256_gcm_sha_384,+rsa_aes_256_sha
Restart the webserver and you should be good to go. Except for, in my case, when
connecting it fails and this is in the error_log:
[:info] [pid 25561:tid 140498883753856] Using nickname SmartCard-HSM (UserPIN):webec.
[:info] [pid 25561:tid 140498711348992] Connection to child 64 established (server echsm.tst.raymii.org:8443, client 127.0.0.1)
[:info] [pid 25561:tid 140498711348992] SSL input filter read failed.
[:error] [pid 25561:tid 140498711348992] SSL Library Error: -12192 Peer reports failure of signature verification or key exchange
Playing around with different settings, ciphersuites and protocols didn't help. Time for a bugreport.
Benchmarking a 1024 bit RSA key
A product folder mentions that the HSM should be a bit faster with smaller keys. Now do note that it's not recommended to use a 1024 bit key in production. But, this is just a benchmark test.
Generate the key:
pkcs11-tool --module opensc-pkcs11.so --login --pin 648219 --keypairgen --key-type rsa:1024 --id 4 --label "httpd hsm"
Output:
Using slot 1 with a present token (0x1)
Please enter User PIN:
Key pair generated:
Private Key Object; RSA
  label:      httpd hsm
  ID:         04
  Usage:      decrypt, sign, unwrap
Public Key Object; RSA 1024 bits
  label:      httpd hsm
  ID:         04
  Usage:      encrypt, verify, wrap
Generate a certificate. See above to find out what to put in the hsm.conf
file. Do note that id 4 is used:
OPENSSL_CONF=./hsm.conf openssl req -engine pkcs11 -keyform engine -new -key 1:4 -nodes -days 3560 -x509 -sha256 -out "rsa1024hsm.tst.raymii.org.pem" -subj "/C=NL/ST=Zuid Holland/L=Rotterdam/O=Sparkling Network/OU=IT Dept/CN=rsa1024hsm.tst.raymii.org"
Convert the certificate to DER:
openssl x509 -in rsa1024hsm.tst.raymii.org.pem -out rsa1024hsm.tst.raymii.org.der -outform der
Load the DER certificate into the HSM together with the key:
pkcs11-tool --module opensc-pkcs11.so --login --pin 648219 --write-object rsa1024hsm.tst.raymii.org.der --type cert --id 4 --label 'webrsa1024'
I gave the certificate object a different label. If we don't do that then
certutil can't differentiate between them.
There should be three certificates now:
certutil -d /etc/nss/db -h 'SmartCard-HSM (UserPIN)' -L
Output:
Certificate Nickname    Trust Attributes
                        SSL,S/MIME,JAR/XPI

Enter Password or Pin for "SmartCard-HSM (UserPIN)":
SmartCard-HSM (UserPIN):httpdcert        u,u,u
SmartCard-HSM (UserPIN):webrsa1024       u,u,u
SmartCard-HSM (UserPIN):webec            u,u,u
In the Apache configuration, change the name of the certificate from:
NSSNickname "SmartCard-HSM (UserPIN):httpdcert"
To:
NSSNickname "SmartCard-HSM (UserPIN):webrsa1024"
Restart the server and you're good to go. No errors this time. Lets see how the benchmarks compare.
5 concurrent users:
siege -c5 -d5 -t30S https://127.0.0.1:8443
Output:
Transactions:             51 hits
Availability:             100.00 %
Elapsed time:             29.74 secs
Data transferred:         0.00 MB
Response time:            0.54 secs
Transaction rate:         1.71 trans/sec
Throughput:               0.00 MB/sec
Concurrency:              0.93
Successful transactions:  51
Failed transactions:      0
Longest transaction:      4.24
Shortest transaction:     0.23
Response time is a lot faster.
10 concurrent users:
siege -c10 -d5 -t30S https://127.0.0.1:8443
Output:
Transactions:             103 hits
Availability:             100.00 %
Elapsed time:             29.91 secs
Data transferred:         0.00 MB
Response time:            0.60 secs
Transaction rate:         3.44 trans/sec
Throughput:               0.00 MB/sec
Concurrency:              2.05
Successful transactions:  103
Failed transactions:      0
Longest transaction:      2.83
Shortest transaction:     0.23
Faster, and holds up pretty well.
20 concurrent users:
siege -c20 -d5 -t30S https://127.0.0.1:8443
Output:
Transactions:             124 hits
Availability:             100.00 %
Elapsed time:             29.03 secs
Data transferred:         0.00 MB
Response time:            2.47 secs
Transaction rate:         4.27 trans/sec
Throughput:               0.00 MB/sec
Concurrency:              10.54
Successful transactions:  124
Failed transactions:      0
Longest transaction:      7.53
Shortest transaction:     0.23
No failed connections as we saw with the 2048 bit key, but the response time is higher.
60 benchmark mode:
siege -c60 -b -t30S https://127.0.0.1:8443
Output:
Transactions:             75 hits
Availability:             74.26 %
Elapsed time:             29.54 secs
Data transferred:         0.00 MB
Response time:            6.13 secs
Transaction rate:         2.54 trans/sec
Throughput:               0.00 MB/sec
Concurrency:              15.57
Successful transactions:  75
Failed transactions:      26
Longest transaction:      20.54
Shortest transaction:     0.25
And as expected that results in failed connections. But, with a 2048 bit key we had 48% Availability, now we have 74%.
As we can see the HSM is faster with a smaller keysize, which is not a strange thing. I'm sad that the EC keys didn't work, since EC is a lot less CPU intensive.
Clustering
If you have multiple HSM's you can use a tool like haproxy in TCP mode to load
balance connections. Using the HSM's DKEK backup and restore functionality you
can have the same private key on multiple devices. I only have one HSM, but my
guess is that with more HSM's the speed increase will be noticable.