Raymii.org

Quis custodiet ipsos custodes?Home | About | All pages | Cluster Status | RSS Feed
Install Ubuntu Linux on the LG Chromebase
Published: 03-08-2015 | Author: Remy van Elst | Text only version of this article
❗ This post is over ten years old. It may no longer be up to date. Opinions may have changed.
Table of Contents

I recently acquired the LG Chromebase 22CV241-W. It is an All in One type machine with Chrome OS. The hardware, excluding the screen and lack of battery, is largely the same as the Acer C720. Of course I removed Chrome OS and installed a real Linux on it, of which you'll find instructions below. In my case it is Ubuntu Mate. Arch Linux also works fine, but this was for someone else, so a more beginner friendly distro seemed to be a better choise. This article will cover the removal of Chrome OS and the installation of Ubuntu Mate on the LG Chromebase.
Recently I removed all Google Ads from this site due to their invasive tracking, as well as Google Analytics. Please, if you found this content useful, consider a small donation using any of the options below. It means the world to me if you show your appreciation and you'll help pay the server costs:
GitHub Sponsorship
PCBWay referral link (You get $5, I get $20 after you've placed an order)
Digital Ocea referral link ($200 credit for 60 days. Spend $25 after your credit expires and I'll get $25!)
Hardware
The specifications are quite good for an All in One of this price:
- 21.5" 1080p (19201080) IPS screen
- Intel Celeron 2955U @ 1.4GHz CPU
- 2GB DDR3 RAM
- 16GB SSD (onboard)
- Bluetooth 4.0
- WiFi (802.11 a/b/g/n)
- 1x Gbit
- 1x USB 3.0
- 3x USB 2.0
- 1x HDMI In
With the HDMI in port you can use it as an external display for another PC or laptop. If you don't like Chrome OS or Linux you can just plug this in to your PC or laptop and use it as a second screen.
The USB 3.0 port is on the side of the screen, the rest in on the back.
The hardware is more than enough to do basic Word processing, browsing, a bit of LaTeX and Python programming. Which are exactly the things the machine was going to be used for.
Software
By default the machine runs Chrome OS. That is a fine OS, well enough for basic computer usage for 90% of the population. It features all the stuff you'd expect, in a browser. I have a Chromebook myself and I often use it on the go for notes, email and basic browsing, since it is very light and boots in under 2 seconds.
If you want to do other things than browsing, like using LibreOffice, VLC or other programs, you're out of luck with a Chrome[book/base/box]. It runs only Google-sanctioned software, which is just Chrome and a simple desktop shell.
Google however uses a lot of Open Source software in Chrome OS. The machine runs Coreboot as the BIOS. You do need to flash another version of Coreboot since this one doesn't understand the USB keyboard. That is covered later on.
You'll need a USB stick of at least 2 GB to install Ubuntu MATE from. You also
need to download the Ubuntu Mate ISO and write it to the USB stick. You can do
this with the Startup Disk Creator or by using dd:
# replace sdX with your device.
dd if=ubuntu-mate-15.04-desktop-i386.iso of=/dev/sdX bs=1M; sync
The process is not that complicated:
- Boot in Recovery Mode
- Enable Developer Mode
- Flash BIOS
- Enable Legacy & USB Boot
- Install Ubuntu
Booting Recovery Mode & Enabling Developer Mode
You need to boot in to Recovery Mode before you can enable Developer Mode. Here's how to boot in to Recovery Mode.
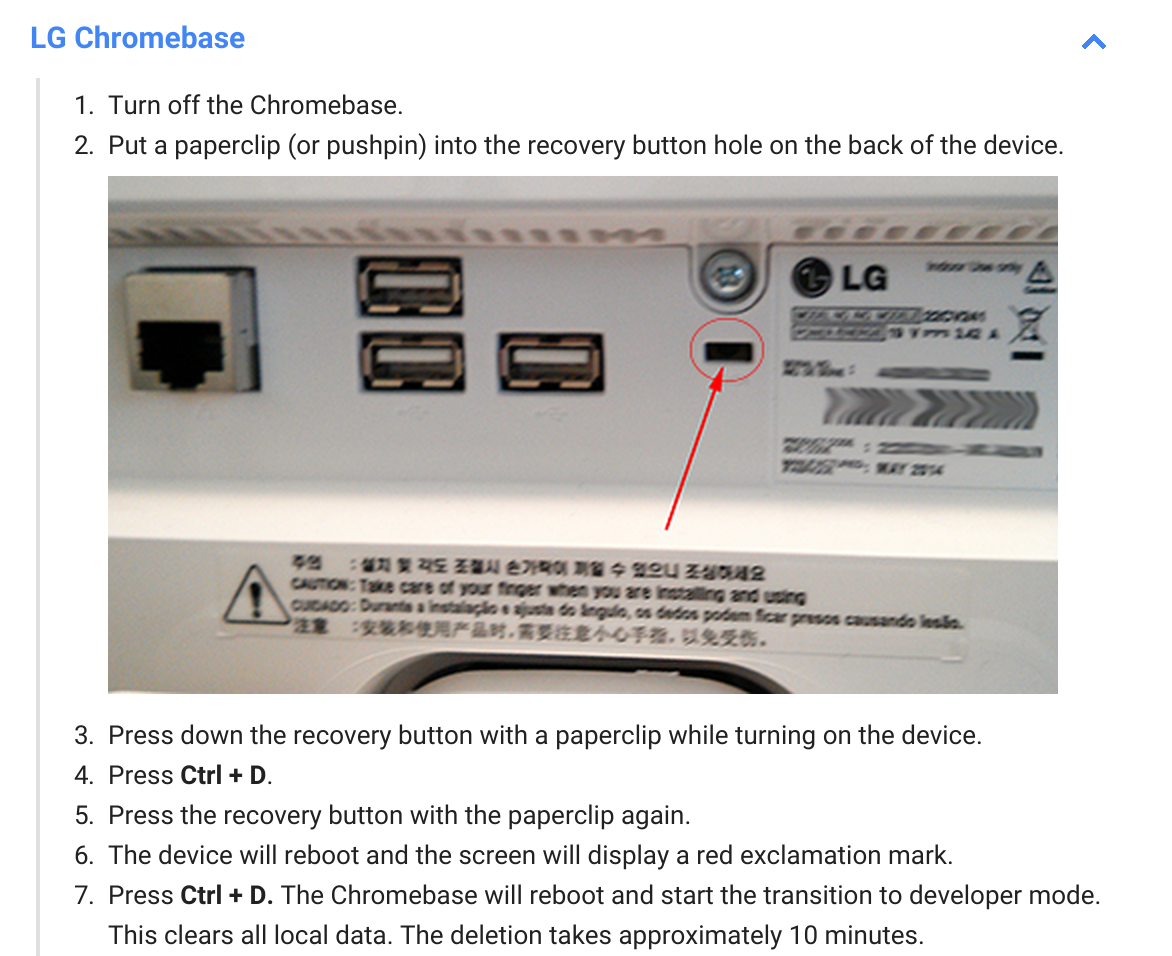
- Turn off the Chromebase
- Plug a paper clip in the Kensington Lock hole in the back and press the button.
- While the button is pressed, power on the Chromebase
- Press CTRL+D
- Press the Recovery Button again
- The device will reboot.
- Press CTRL+D again to boot in Developer Mode
Booting in to Developer Mode will wipe the Chromebook. All data stored is removed, except for Chrome OS.
Flashing SeaBIOS
As said, you need to flash the SeaBIOS part of coreboot to make the USB keyboard work.
Start up in Developer Mode, open a terminal (CTRL+ALT+T) and type shell.
You're now in the shell.
Visit this site and read the documentation and FAQ.
If you've done that you've also found the command to flash the BIOS. It's here as well for reference:
cd; rm -f flash_chromebook_rom.sh; curl -k -L -O https://johnlewis.ie/flash_chromebook_rom.sh; sudo -E bash flash_chromebook_rom.sh
If you've flashed the Bios you need to also enable Legacy Boot and USB Boot. Still in the shell, execute these commands to do so:
sudo bash
crossystem dev_boot_usb=1 dev_boot_legacy=1
You can now reboot the machine with the reboot command. Plug the USB install
stick in and when the big scary ERROR screen pops up, press CTRL+L (for Legacy
boot). Press ESC and select your USB install disk.
Install Ubuntu MATE
The install is pretty straight forward. If you get the following error at installer boot:
error loading gfxboot
Then just type help and a RETURN, the installer will start up as you'd expect.
It is a normal Ubuntu install, so finish it and reboot. I wiped all the
partitions and created one big / ext4 partition.
Do note that you need to press CTRL+L at every boot to start up in Legacy
mode. NEVER EVER PRESS THE SPACE BAR TO RE-ENABLE OS VERIFICATION! You will need
to make a Chrome OS recovery image, which will wipe the entire disk and your
Linux install.
If you want to solder in your device you can read here how to make the BIOS fully writable. Using the above BIOS script you can then totally skip the Chrome OS screens on boot.
After the install, reboot in to your new shiny Linux. Remember to press CTLR+L
every time you boot, and never press the Space Bar.